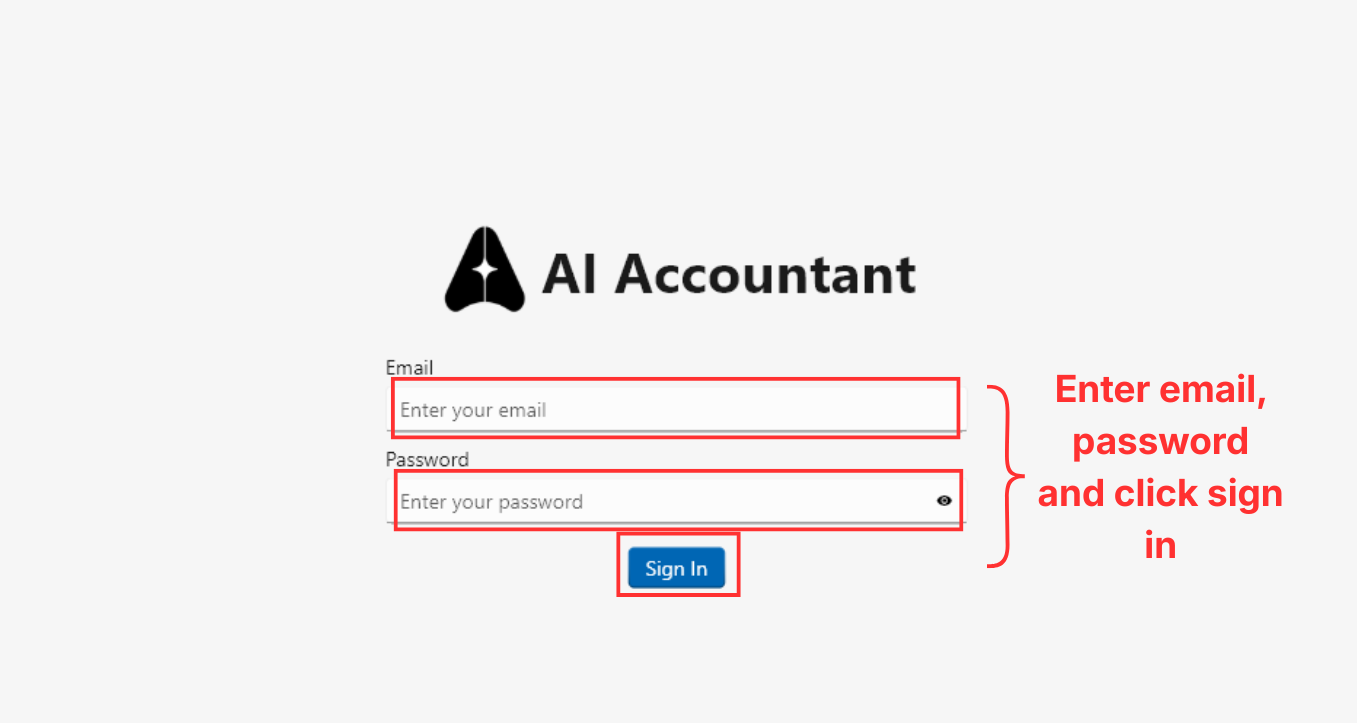
1. Sign up at https://app.aiaccountant.com/sign-up
Click below for a detailed step by step registration guide
Ai Accountant Registration Step By Step Guide
1. Keep Tally open at all times
2. Ensure Tally Prime version is 5.1 or above
Note:
If you are facing any issues in any of the above steps check our troubleshooting guide.
You will find the troubleshooting guide for each stage at the end of that stage.
1. Open Tally Prime
Launch Tally Prime on your computer.
2. Go to Gateway of Tally
Once your company opens, you will land on the Gateway of Tally screen.
.png)
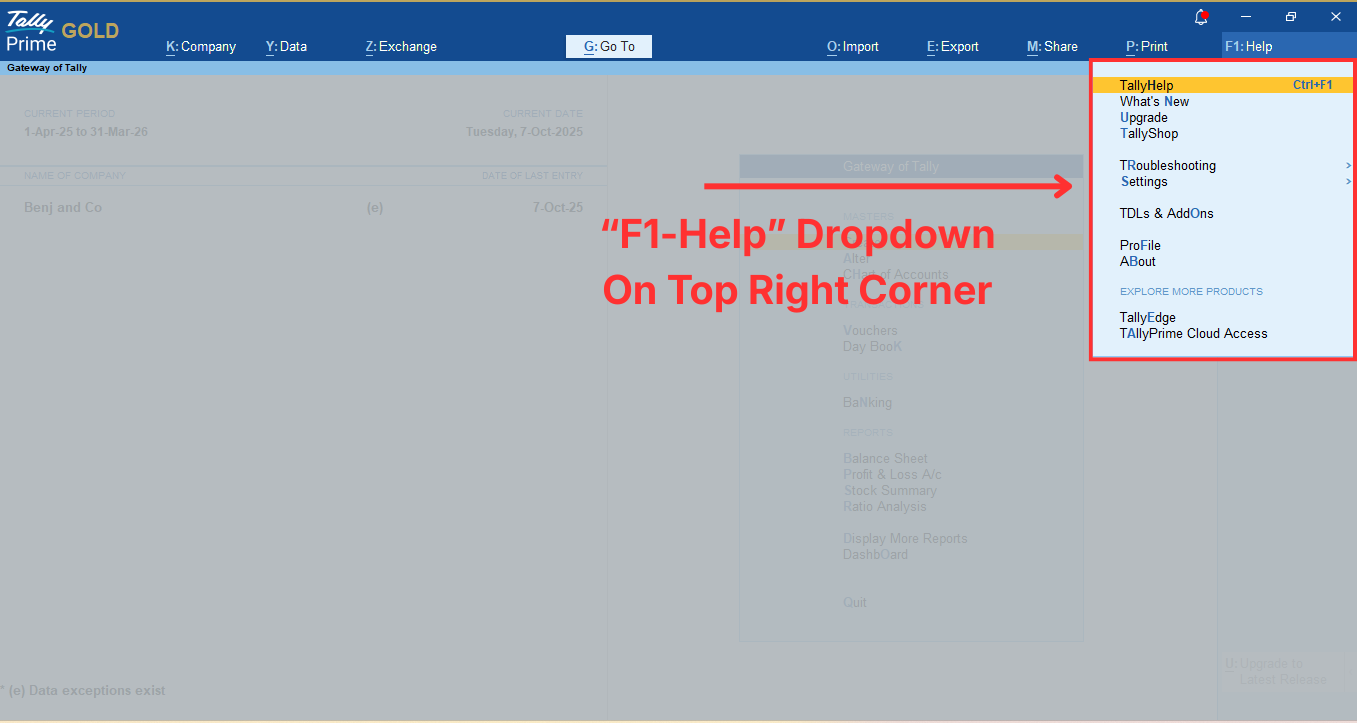
3. Press F1 to open the Help menu
When you press F1, a dropdown menu will appear with options such as Tally Help, What’s New, Upgrade, Settings, etc.
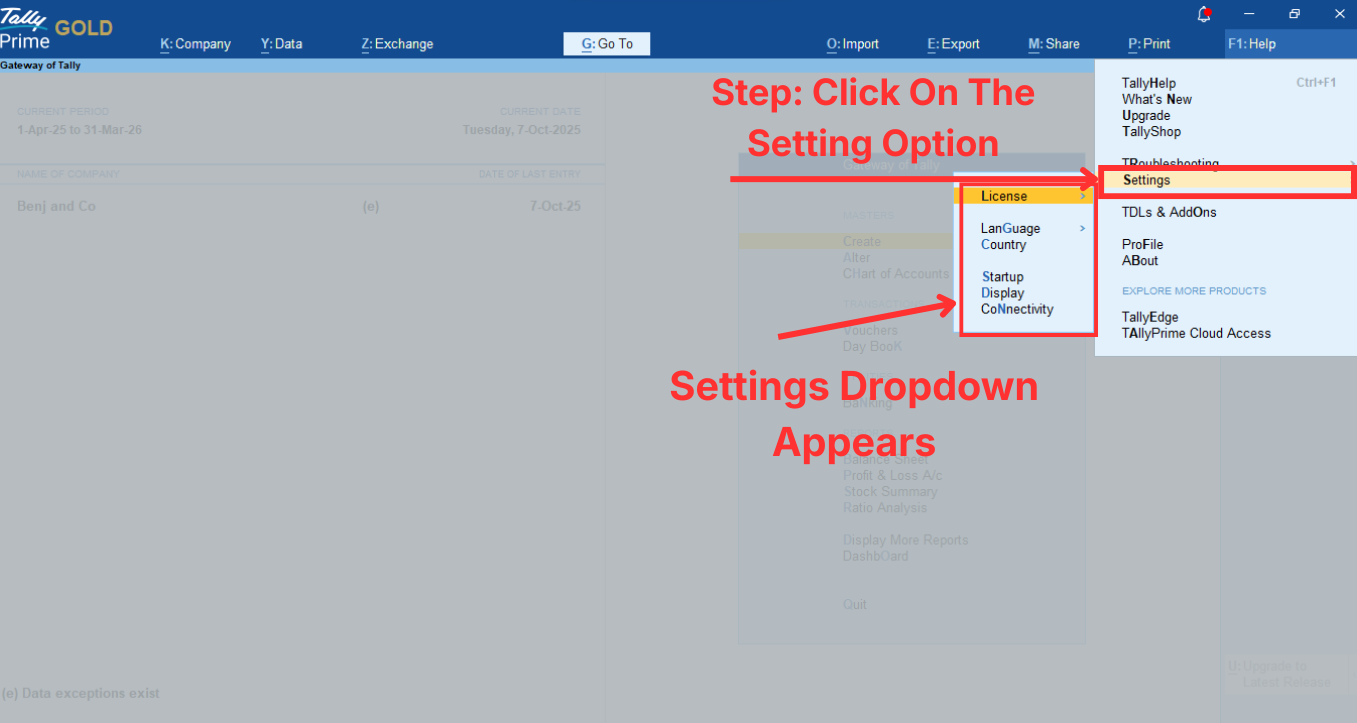
4. Select “Settings”
From the Help menu, click on Settings. A new Settings panel will open on the right side.
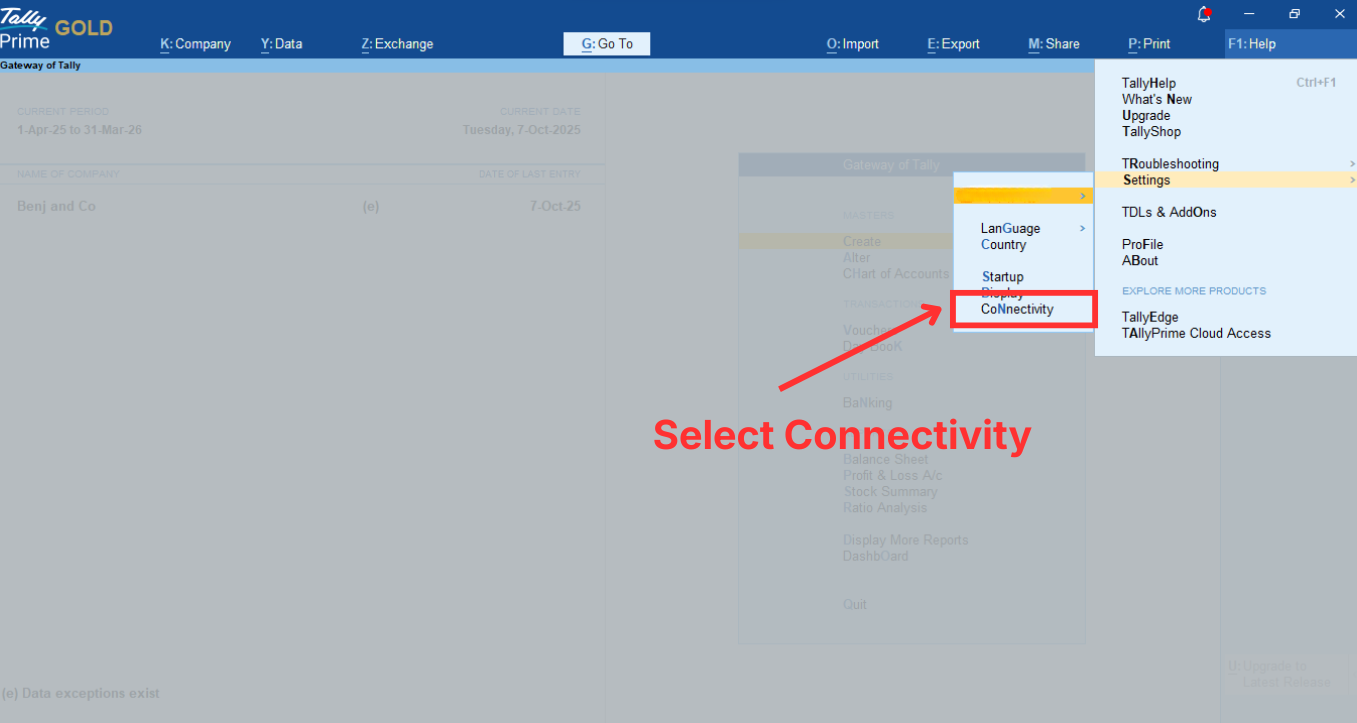
5. Select “Connectivity”
Inside the Settings panel, click on Connectivity.
When you do this, Tally will display a list of Connectivity configuration options.
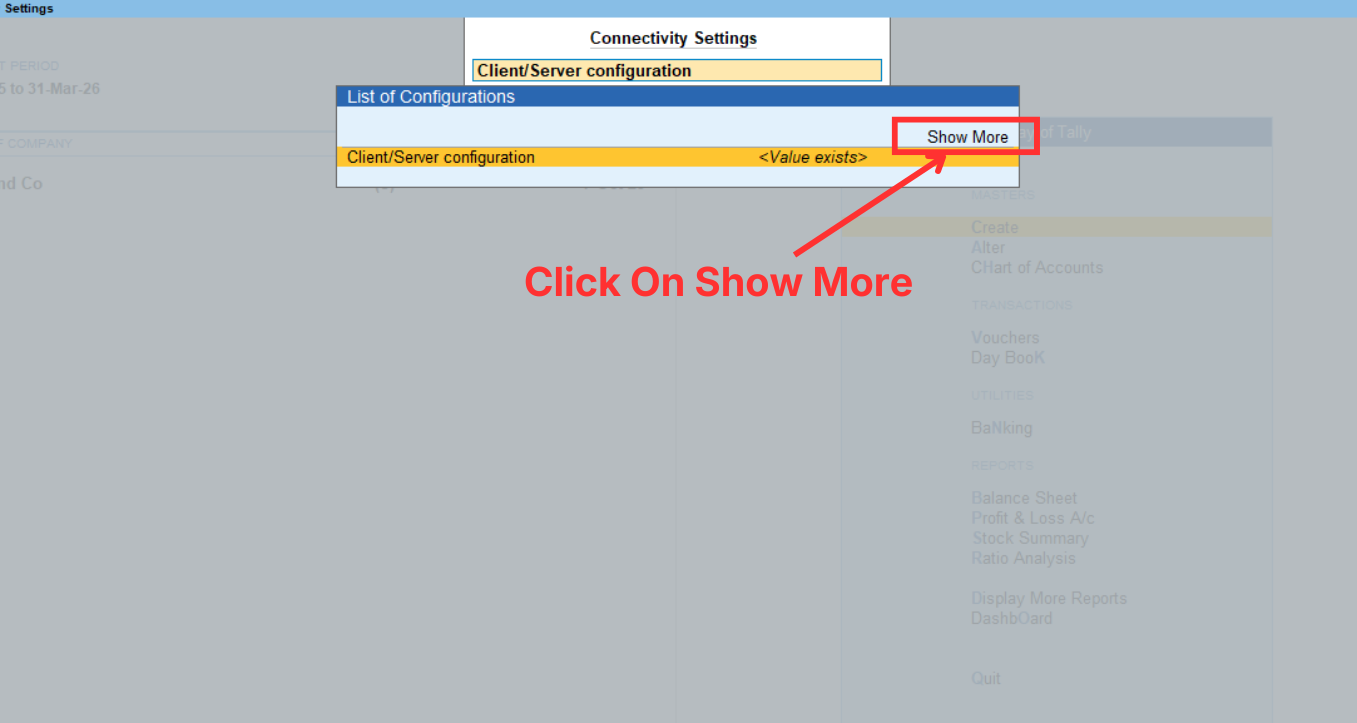
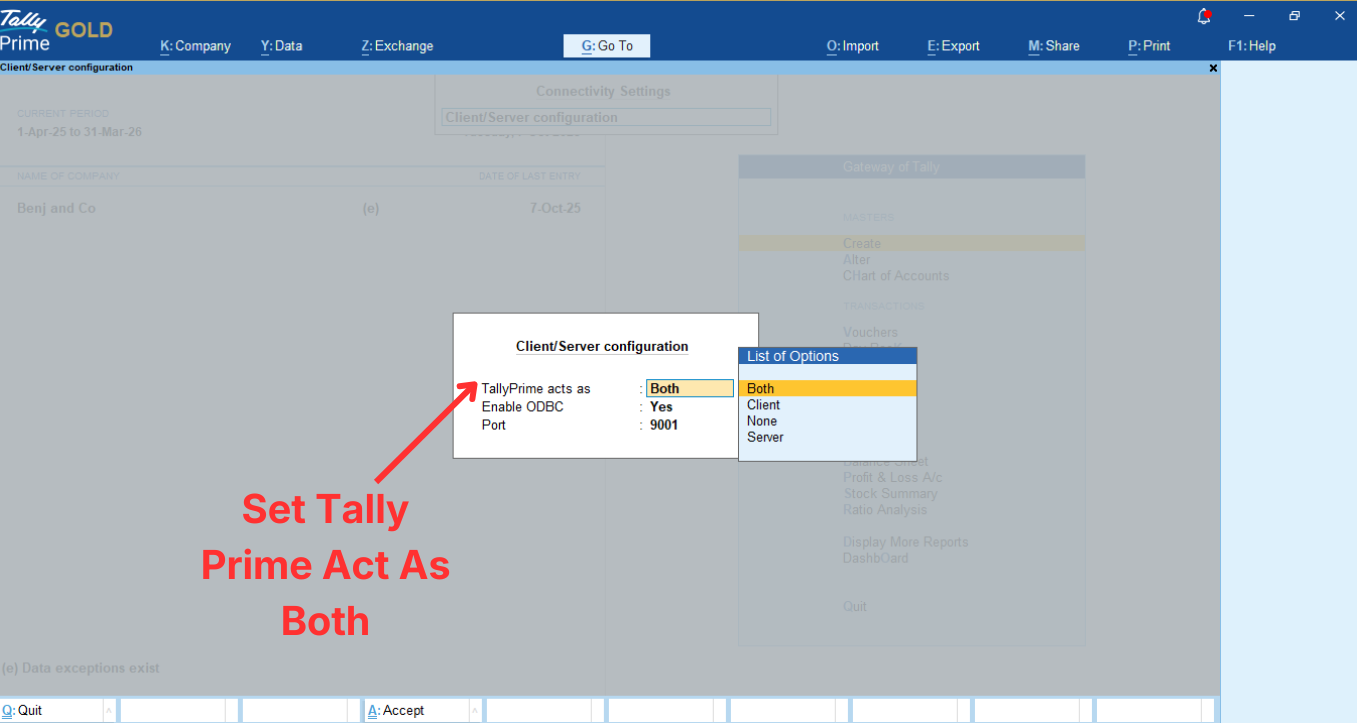
1. Inside Connectivity Settings, click Client/Server Configuration
A configuration box will open.
In this box, there are three fields.
2. Set TallyPrime acts as: Both
In the popup, look for the first field labeled Enable ODBC.
Set this to Yes.
3. Next, set Enable ODBC = Yes
In the same popup, look for the second field labeled Enable ODBC.
Set this to Yes.
This ensures AI Accountant can read data from Tally through ODBC.

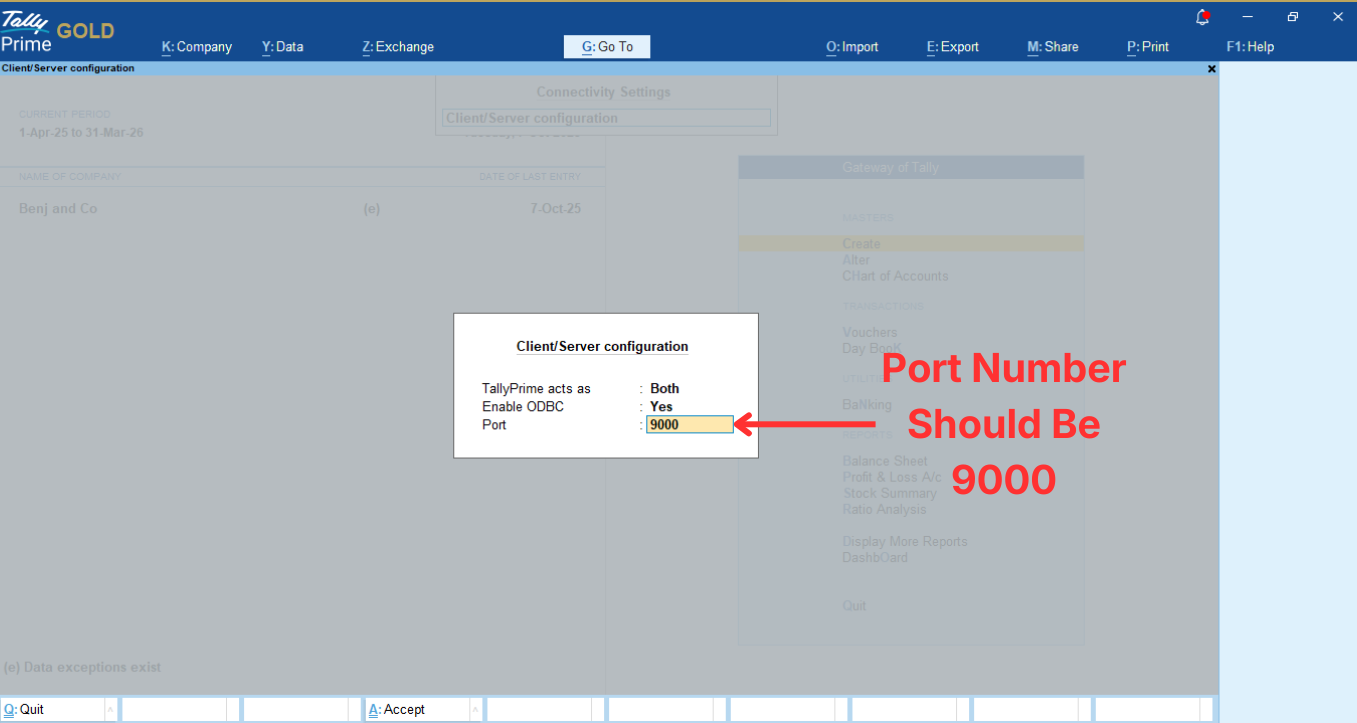
*4. Note the Port Number (default: 9000)
Just below the ODBC field, you will see the Port number.
This is the port AI Accountant will use to connect to Tally.
By default, it is usually 9000 or 9001.
Make a note of this number — you will enter it during integration.
5. Press Ctrl + A to save
Once all values are set, press Ctrl + A to accept the changes.
Tally will apply your configuration.
6. Let Tally restart automatically
After you press Ctrl + A, Tally may show a quick loading message and automatically restart itself to apply the new Connectivity and ODBC settings.
You do not need to close or reopen Tally manually.
Tally will:
Once Tally has restarted and the company is reopened, your settings are fully applied.
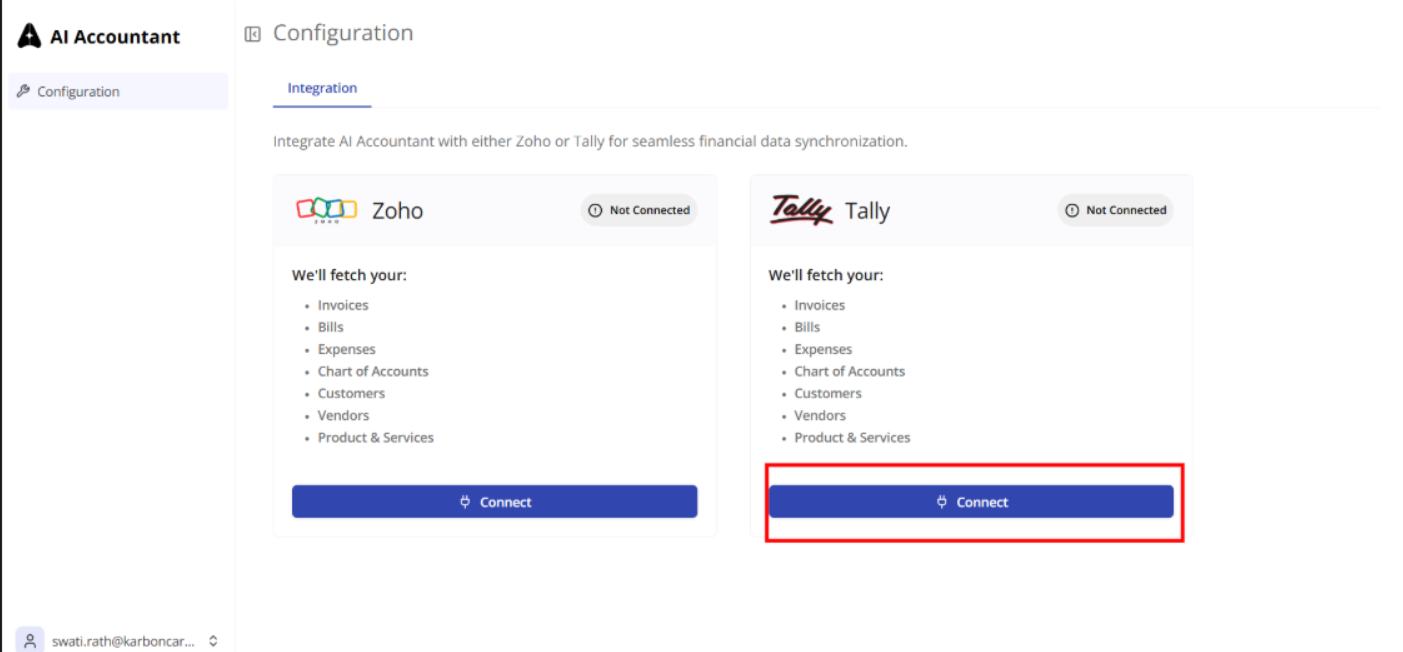
1. In AI Accountant web app, click Connect under Tally
2. Click Download Aia_tally_Connector.exe

Make sure you download it on the same machine where Tally is installed
3. Confirm the file is downloaded
1. Open AiA Connector
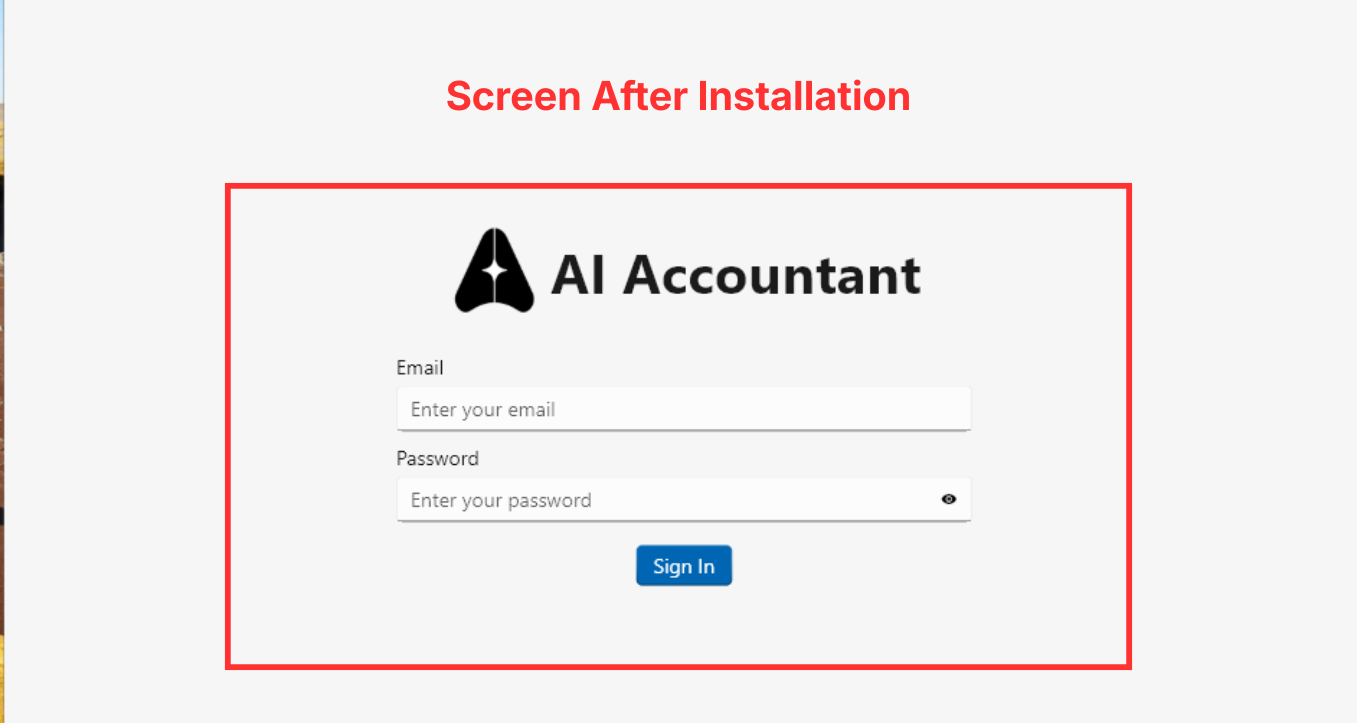
2. Login using your AI Accountant credentials
Enter the email ID and password you set earlier..(check this info)
3. Wait for Connection Status
4. Confirm status shows Connected

STAGE 2: AiA Connector Installation & TDL Load Issues
1. Go to Gateway of Tally
It appears once you open tally prime.
.png)
2. Select your company
It appears on left side of tally prime. (How do they open it…by just clicking on the name?)

3. Open the company
(Need to show what appears after opening company….)
4. Keep Tally running
Here it is showing Benj and Co, the one that we had on our tally gateway dashboard.

STAGE 3: Company Selection & Sync Issues
1. Review the pre-filled company details

2. Correct if needed
3. Click Save
1. Select the GST slab shown on the left (On the left or right on the line)

2. Select correct ledger on the right

3. Map Input & Output GST (what image for this section?..The next button is after input output matching?)
1. Select TDS rates
Once you press next after mapping GST Rates, you will automatically get to TDS Map. If not, you can select it on the top bar.

2. Choose corresponding TDS ledger

1. Review bank & cash ledgers on left (On the left or right on the line)

2. Fill the account type
Select whether it’s a bank account or credit card under the account type.

3. Select correct bank name (Ledger name and bank name same?)
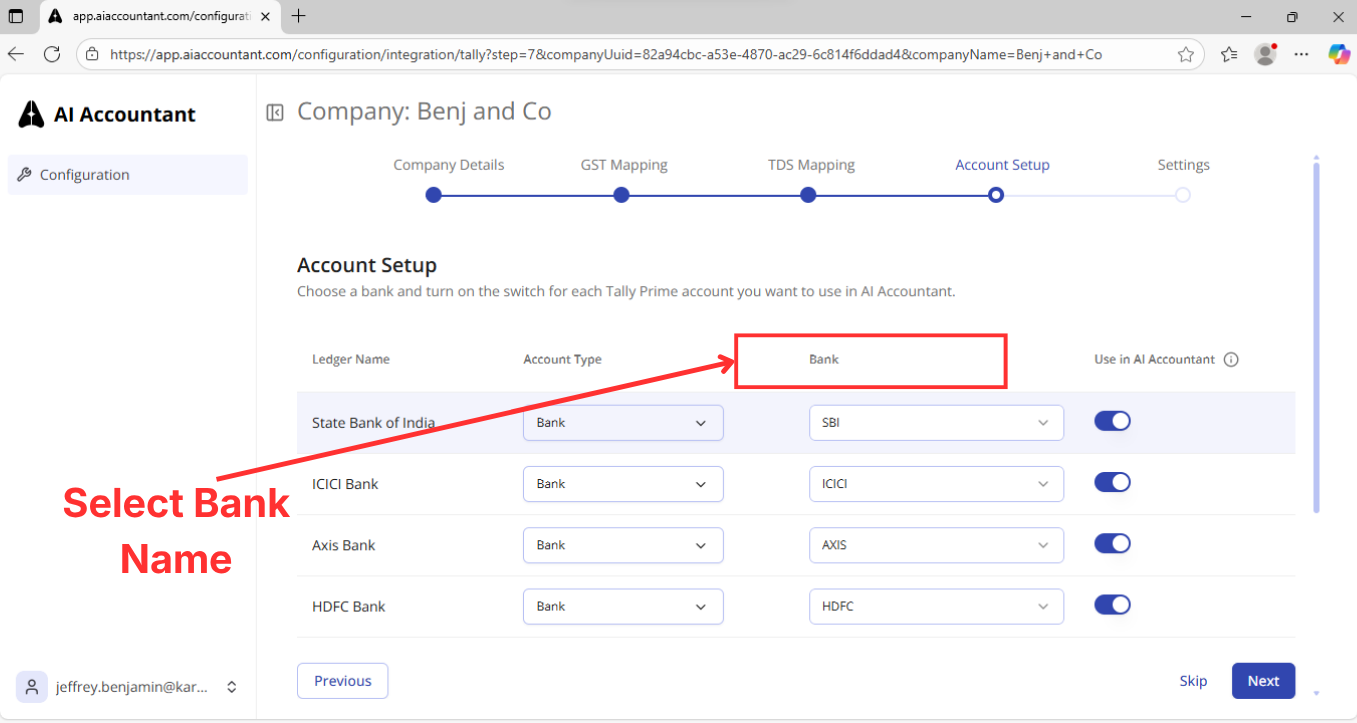
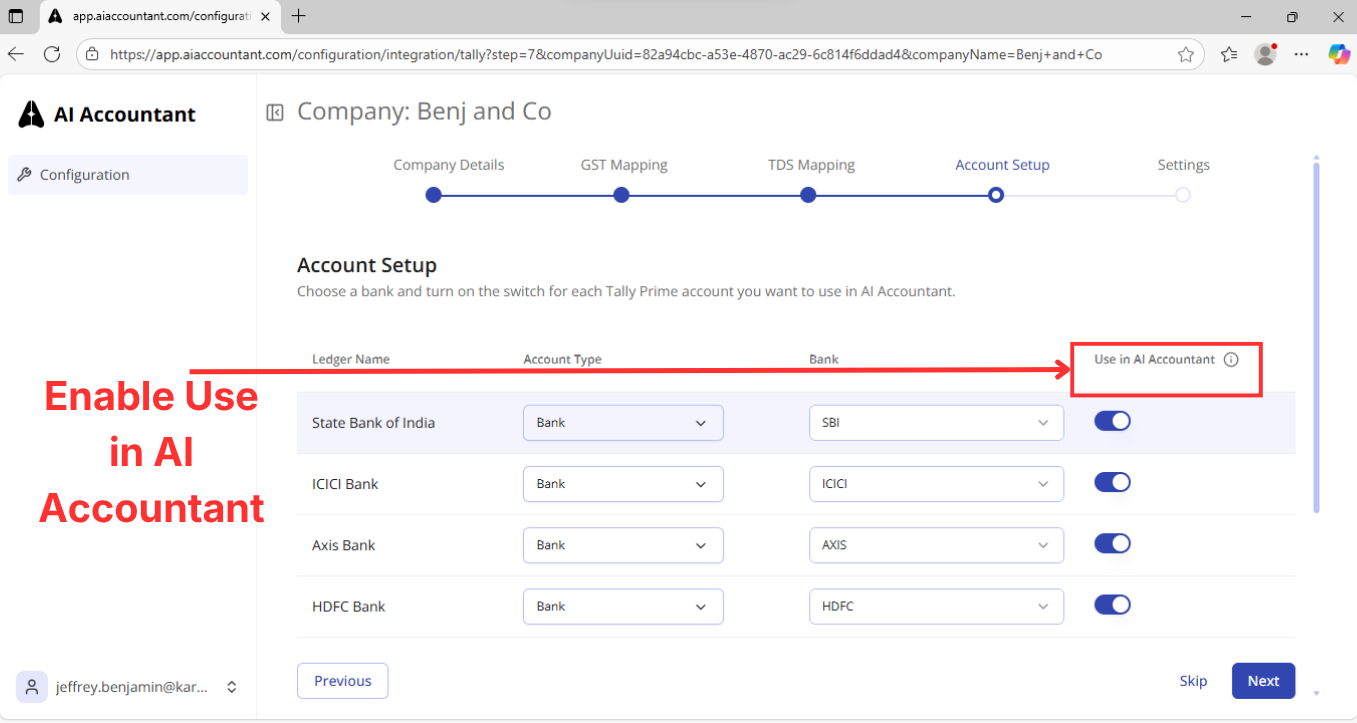
4. Enable Use in AI Accountant
5. Save (Where is the save button?)
1. Select Automatic or Manual invoice numbering

2. Click Save & Proceed

STAGE 4: GST, TDS, Bank & Invoice Setup Issues
1. Go back to the dashboard…or you will be directed to where you can see if tally is connected.
2. Click Sync Masters
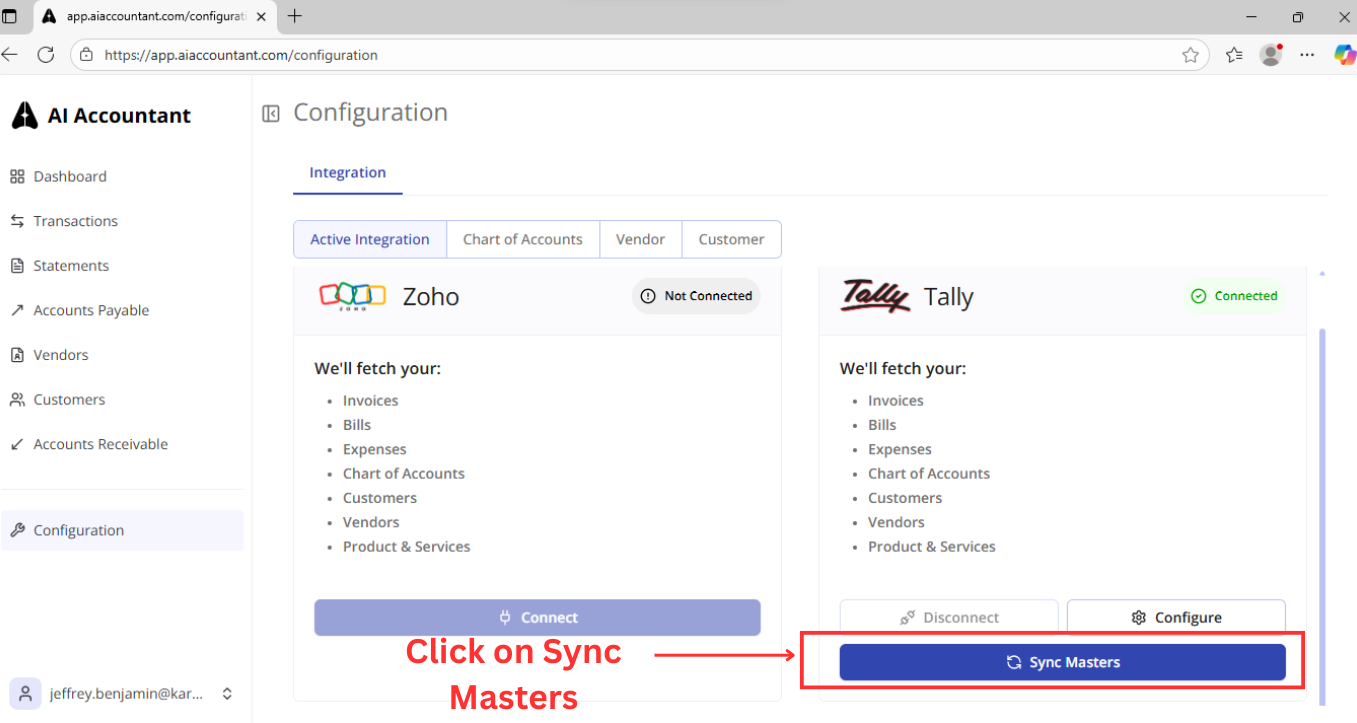
3. Verify Vendors, Customers, Chart of Accounts

4. Open Dashboard

STAGE 5: Sync & Dashboard Issues
